
13 May 2022
Computing Systems - The Enduring Concepts For Programmers - Programs are Translated by Other Programs into Different Forms

In the previous article, we started our journey to understand the enduring concepts behind computing systems and how these concepts can make us better programmers.
We were introduced to our hello.c source code and we learnt that we would trace the life of this program to understand these enduring concepts. In this article, we will zoom into the remarkable phases that our application goes through to be executed by a computer and later, we will learn why understanding this can be beneficial to us as programmers.
The hello.c program begins its life as high-level source code written in the C programming language. High-level here implies that it can be easily read, written and understood by a human who understands the C syntax because C provides an abstraction from the machine’s instruction set architecture.
For this application to run on a system, the individual statements in the source code must be translated by other programs into a sequence of low-level instructions that target a specific CPU architecture, e.g, x86, ARM, AMD64. Low-level instructions are instructions that are closer to what the computer understands, e.g, machine code, or assembly code.
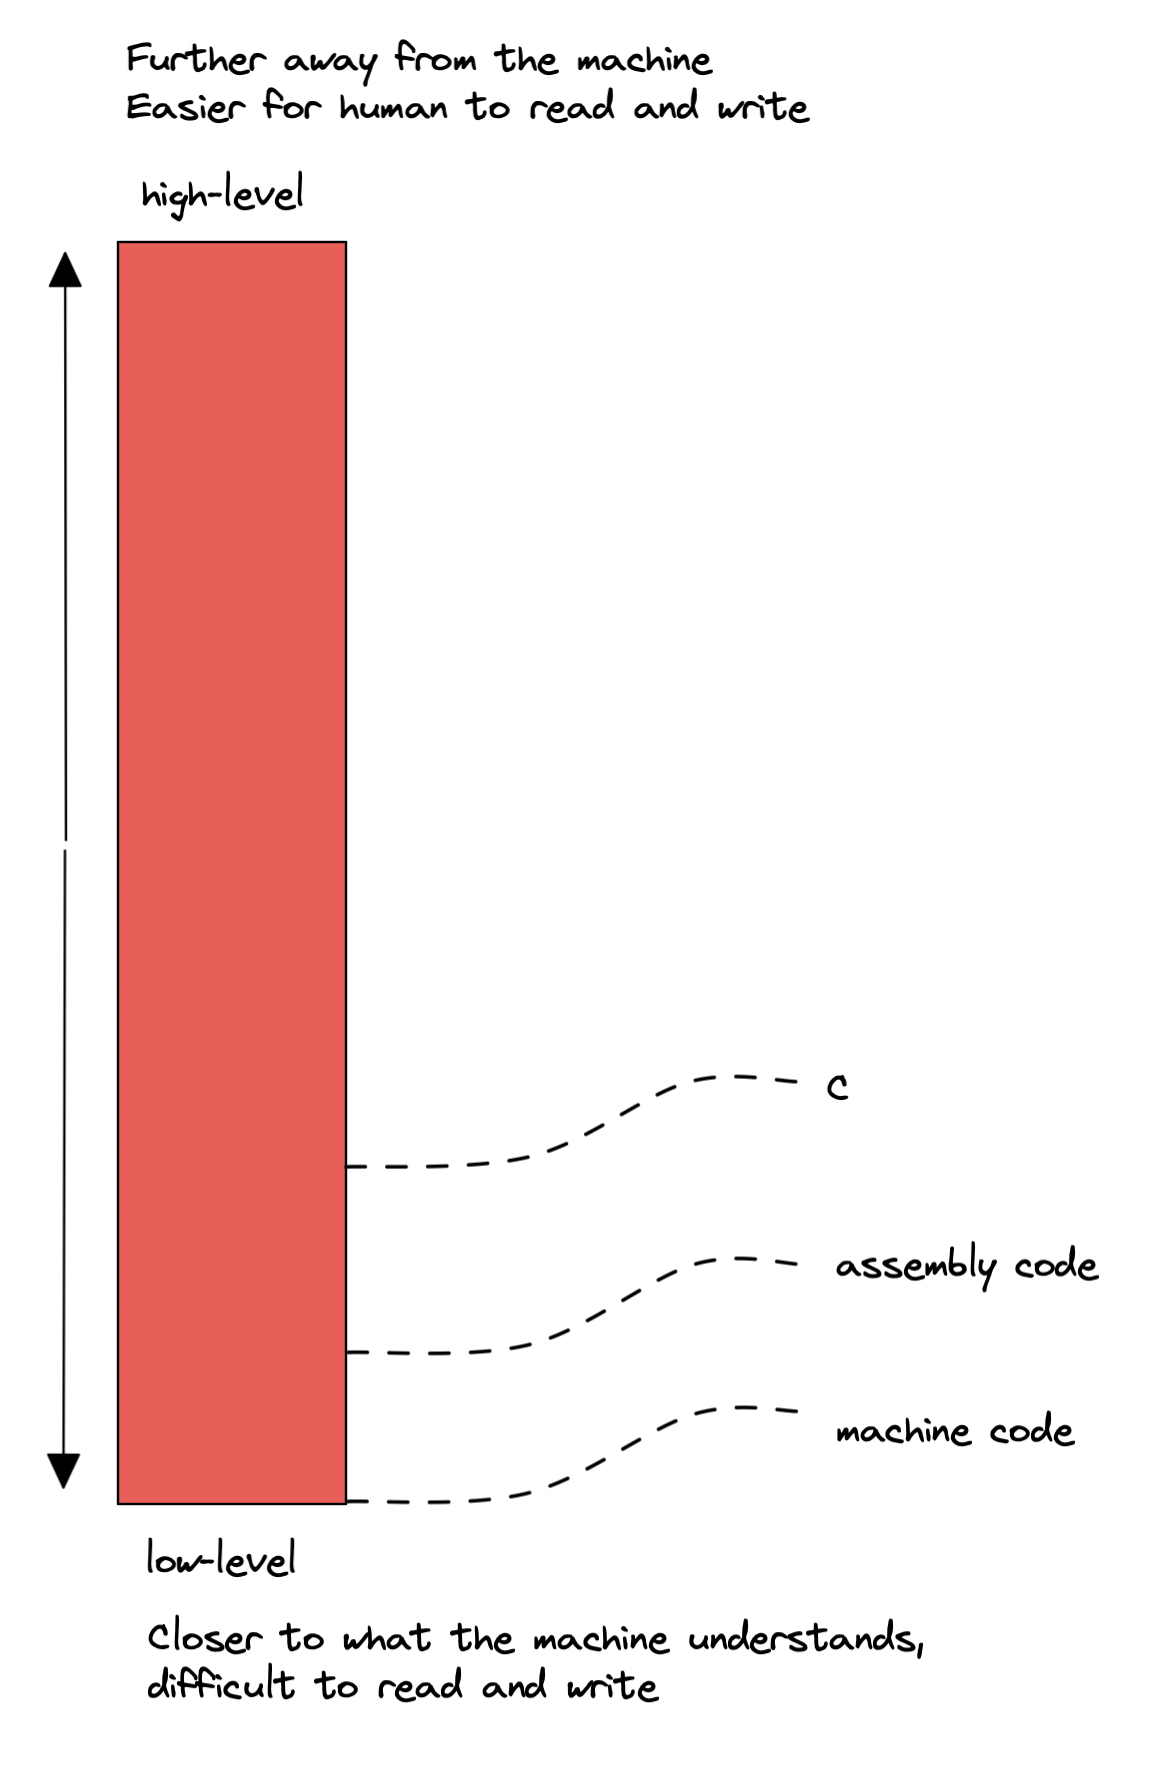
Fig 1: Low-level vs High-level code
Generally, if this process happens on a system with an x86 CPU, the instruction set for the object program would be x86 based. These instructions would then be packaged into an executable object program and stored to disk as a binary file.
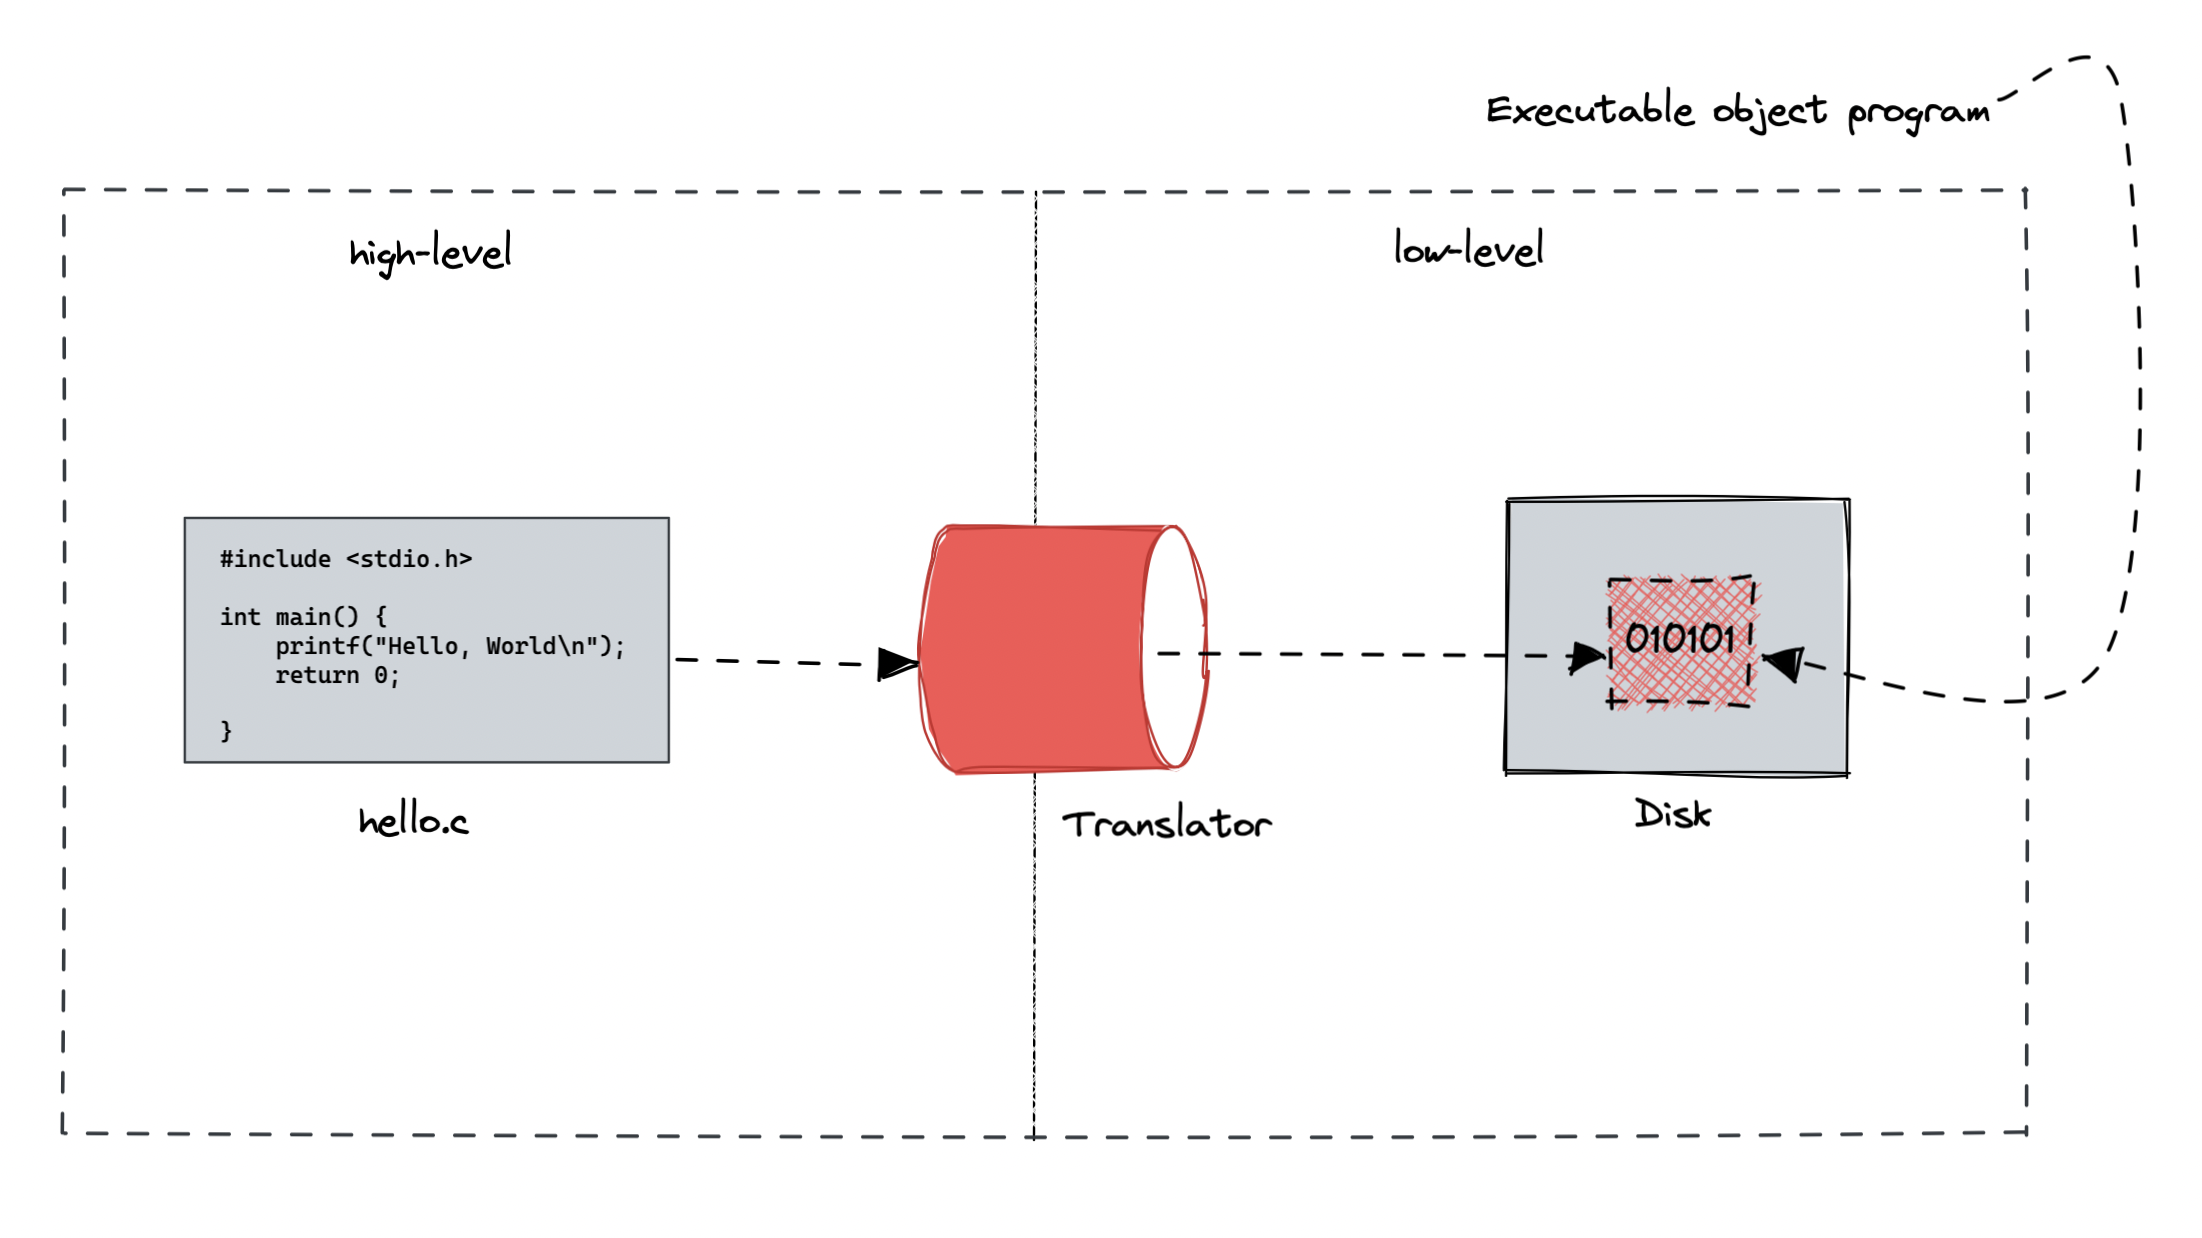
Fig 2: A high-level visualisation of how our hello.c code is translated into an executable binary file (executable object program)
On a Unix based system, the compiler driver is responsible for translating the source code to an executable object program. This process is called compilation. Fig 3 shows what the compilation process looks like when we use a compiler to compile our hello.c source code.

Fig 3: The compilation system in action
The gcc (GNU Compiler Collection) is used to read the hello.c source file and translate it into an executable object file.
gcc -o hello hello.cAs shown in Fig 3, the compilation process occurs in four phases. For each phase, a program will be dispatched to do its part in translating the source code (preprocessor, compiler, assembler and linker). These four phases are:
- Preprocessing phase
- Compilation phase
- Assembler phase
- Linking phase
Let’s take a deeper look at each phase of the compilation process.
Preprocessor Phase
In this phase, the application (cpp) modifies the original hello.c source code according to the C Preprocessor directives that begin with the ‘#’ character. Examples of C preprocessor directives are:
#include#define#undef#if#ifdef#ifndef#error__FILE____LINE____DATE____TIME____TIMESTAMP__pragma# macro operator## macro operator
These directives allow additional actions to be taken on the hello.c source code before it is compiled into object code. An example of this is found in line 1 of hello.c. The #include <stdio.h> command would tell the preprocessor to read the contents of the system header file stdio.h and insert it directly into the program text. This would result in another C program with the .i extension, in our case hello.i as illustrated in Fig 4.
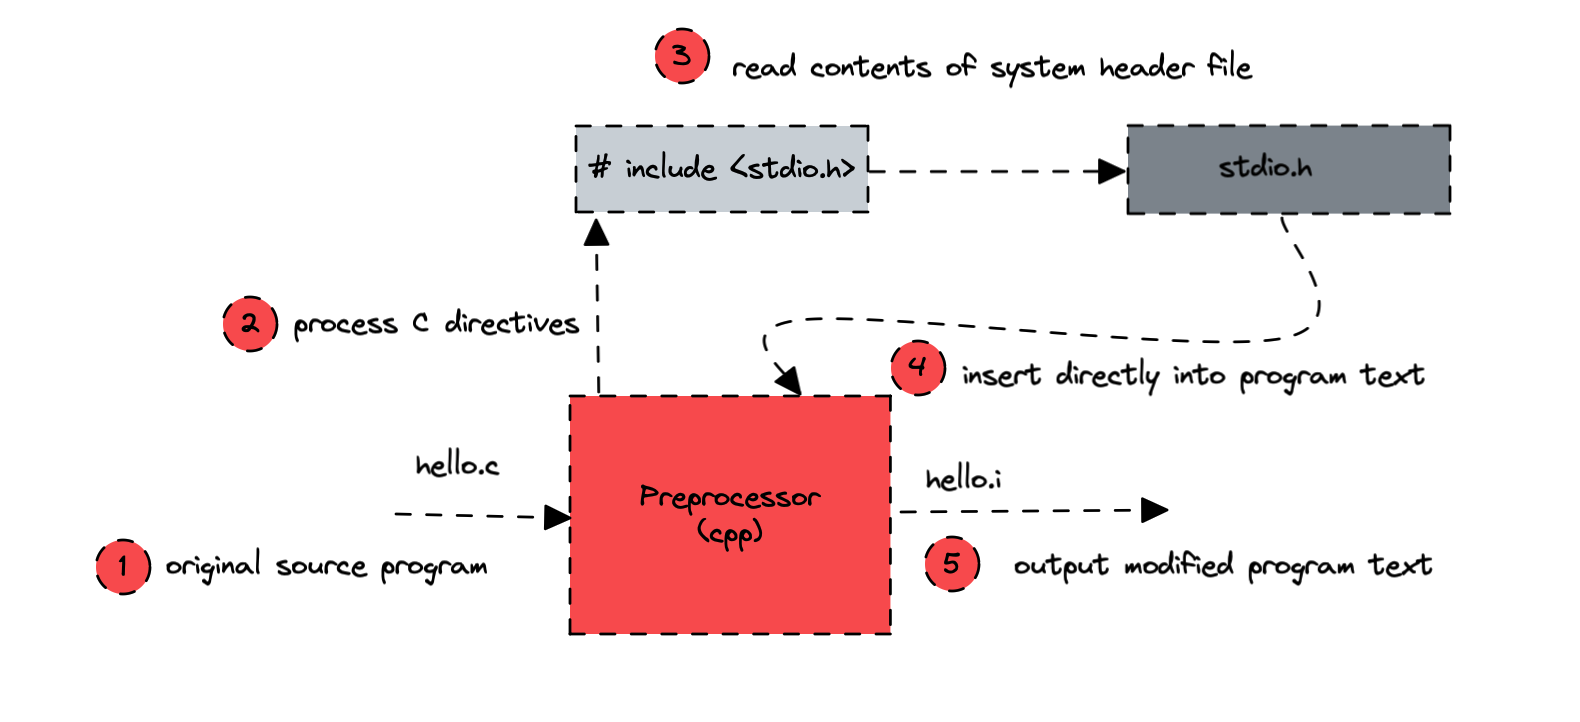
Fig 4: The preprocessor in action
To see this process in action in our Unix based system, we would run the following in the command line:
cpp hello.c hello.iThe cpp program would output a hello.i text file which would then be handed over to the compiler in the second step. Let’s now continue to further our understanding of the compilation process by taking a deeper look at the second phase, called the compilation phase.
Compilation Phase
In this phase, the program (cc) takes the hello.i and translates it, this would result in a hello.s text file which contains assembly code.
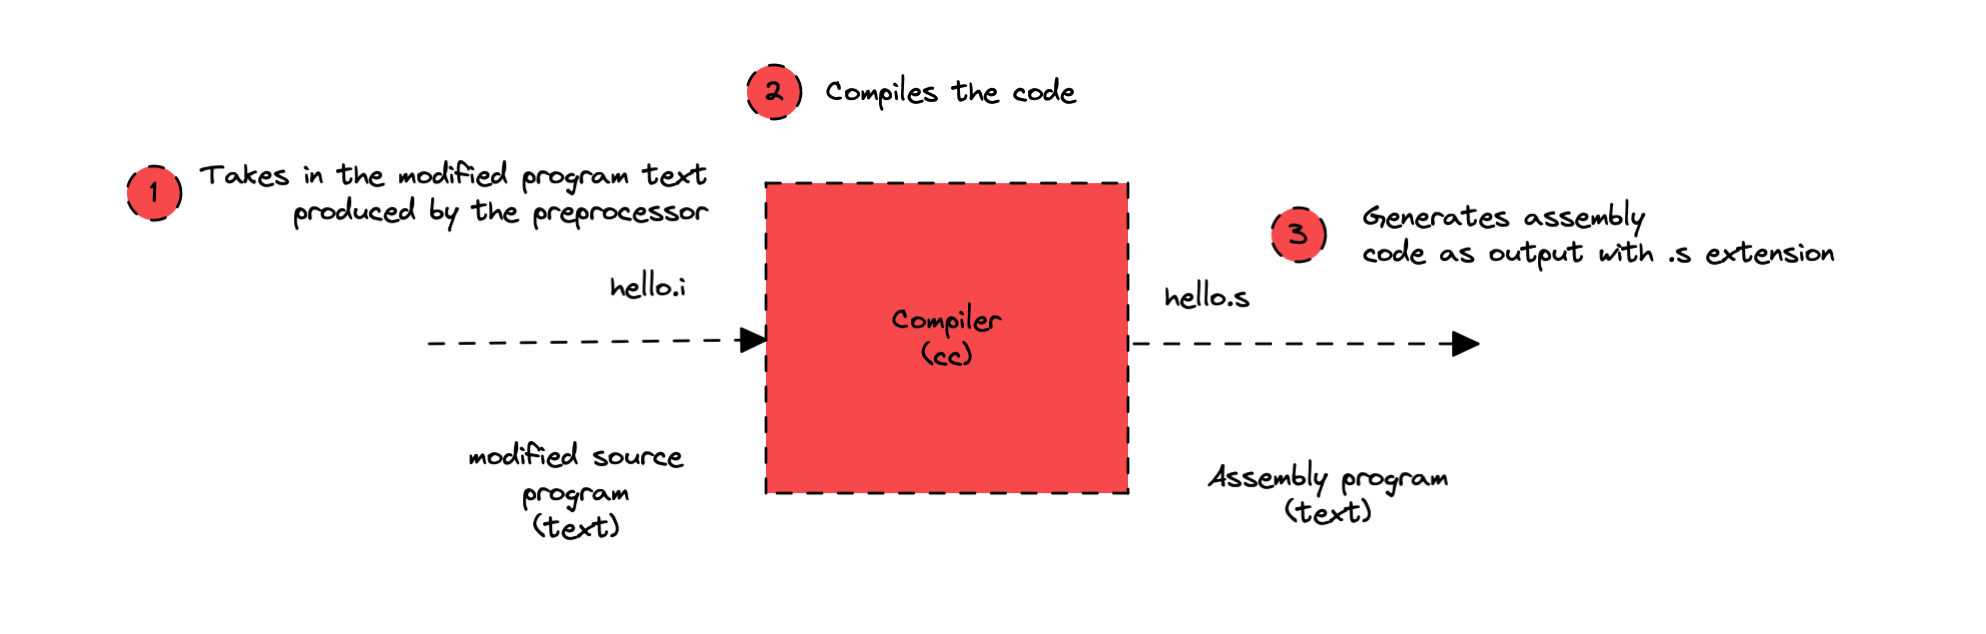
Fig 5: The compilation phase in action
To see this process in action, run the following in your terminal:
cc -S hello.i The above command will tell the cc program to take the hello.i generated in the previous phase of the compilation process and compile it, resulting in assembly code similiar to this:
.file   "hello.c"
        .text
        .section        .rodata
.LC0:
        .string "Hello, World"
        .text
        .globl  main
        .type   main, @function
main:
.LFB0:
        .cfi_startproc
        endbr64
        pushq   %rbp
        .cfi_def_cfa_offset 16
        .cfi_offset 6, -16
        movq    %rsp, %rbp
        .cfi_def_cfa_register 6
        leaq    .LC0(%rip), %rax
        movq    %rax, %rdi
        call    puts@PLT
        movl    $0, %eax
        popq    %rbp
        .cfi_def_cfa 7, 8
        ret
        .cfi_endproc
.LFE0:
        .size   main, .-main
        .ident  "GCC: (Ubuntu 11.2.0-19ubuntu1) 11.2.0"
        .section        .note.GNU-stack,"",@progbits
        .section        .note.gnu.property,"a"
        .align 8
        .long   1f - 0f
        .long   4f - 1f
        .long   5
0:
        .string "GNU"
1:
        .align 8
        .long   0xc0000002
        .long   3f - 2f
2:
        .long   0x3
3:
        .align 8
4:
Note that the assembly code that is generated is highly dependent on your system’s CPU (central processing unit) architecture, so compiling the hello.c on a machine with the Apple M1 system on a chip would result in slighly different assembly code given that the Apple M1’s CPU is ARM-based. Each line in the assembly code above describes one low-level machine instruction in a textual form. This is why we previously stated that C is an abstraction. Assembly is also an abstraction but it is much closer to the hardware than C. If these abstractions did not exist, programmers would code in machine language instructions. How fun.
Now that we have an understanding of the compilation phase, let’s see what happens during the next phase, the assembly phase.
Assembly Phase
In this phase, the program (as) takes the hello.s generated in the compilation phase and translates it into machine language instructions., packages them in a form known as a relocatable object program, and stores the result in the object file hello.o.
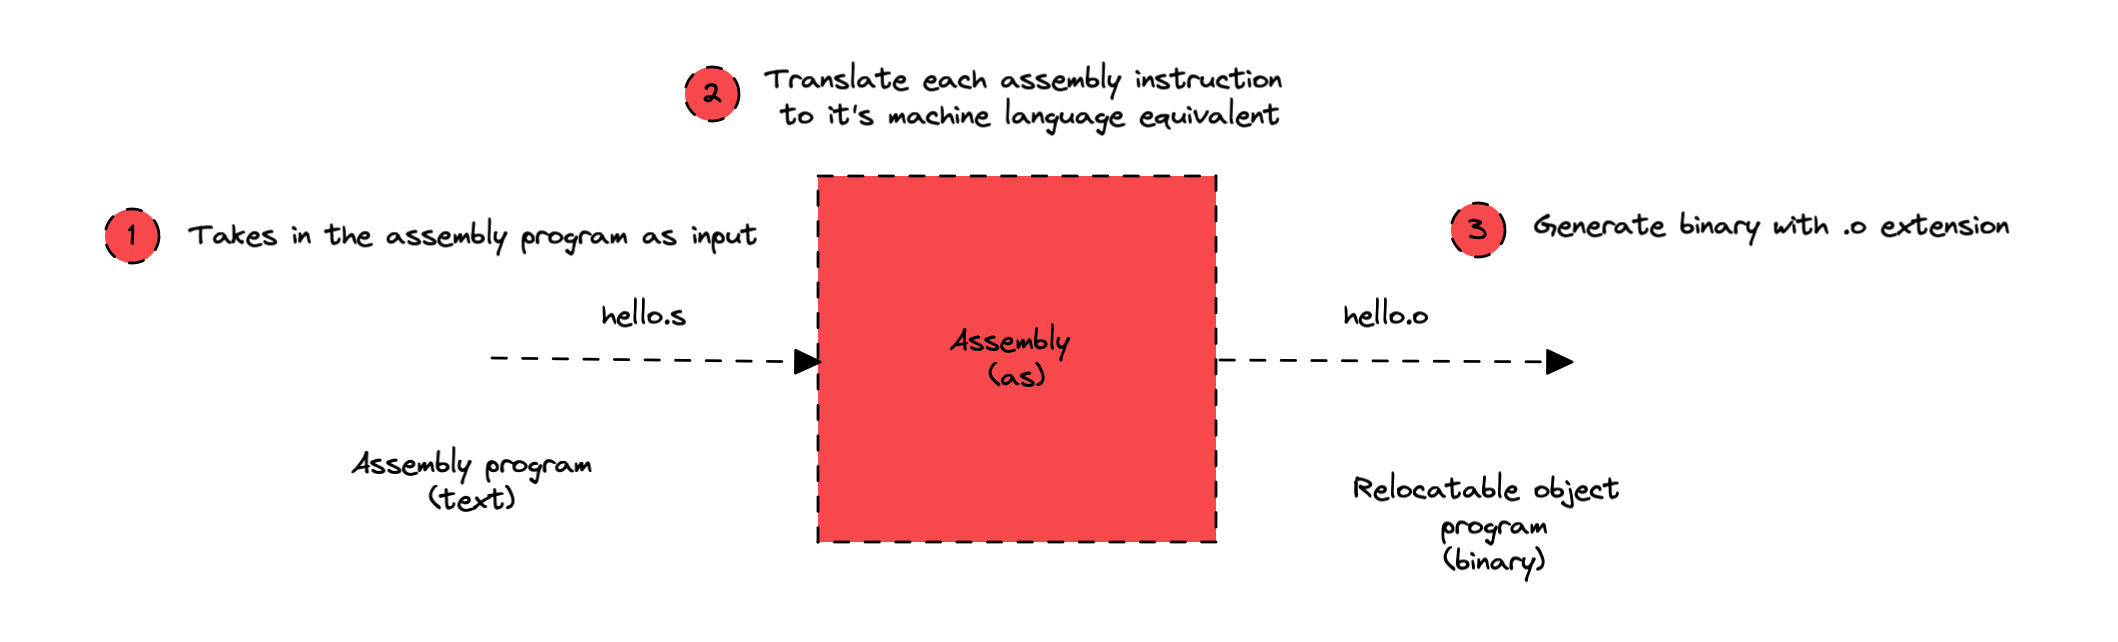
Fig 6: The assembly phase in action
To see this process in action, run the following command in your terminal:
as hello.s -o hello.oThe above command takes in the assembly code in hello.s and translates each instruction to machine code such that it can directly be understood by a computer’s CPU. Opening this object file with a text editor would result in gibberish like the following:
                                                                                                                                                                                                                                                                                                                                                                                                                                                                                                                                                                                                                                                                                            hello.o
^?ELF^B^A^A^@^@^@^@^@^@^@^@^@^A^@>^@^A^@^@^@^@^@^@^@^@^@^@^@^@^@^@^@^@^@^@^@X^B^@^@^@^@^@^@^@^@^@^@@^@^@^@^@^@@^@^N^@
^@�^O^^�UH��H�^E^@^@^@^@H���^@^@^@^@�^@^@^@^@]�Hello, World^@^@GCC: (Ubuntu 11.2.0-19ubuntu1) 11.2.0^@^@^@^@^@^@^@^D^@^@^@^P^@^@^@^E^@^@^@GNU^@^B^@^@�^D^@^@^@^C^@^@^@^@^@^@^@^T^@^@^@^@^@^@^@^AzR^@^Ax^P^A^[^L^G^H�^A^@^@^\^@^@^@^\^@^@^@^@^@^@^@^^^@^@^@^@E^N^P�^BC
^FU^L^G^H^@^@^@^@^@^@^@^@^@^@^@^@^@^@^@^@^@^@^@^@^@^@^@^@^@^@^@^A^@^@^@^D^@��^@^@^@^@^@^@^@^@^@^@^@^@^@^@^@^@^@^@^@^@^C^@^A^@^@^@^@^@^@^@^@^@^@^@^@^@^@^@^@^@^@^@^@^@^C^@^E^@^@^@^@^@^@^@^@^@^@^@^@^@^@^@^@^@   ^@^@^@^R^@^A^@^@^@^@^@^@^@^@^@^^^@^@^@^@^@^@^@^N^@^@^@^P^@^@^@^@^@^@^@^@^@^@^@^@^@^@^@^@^@^@^@^@hello.c^@main^@puts^@^@^@^@^@^@^K^@^@^@^@^@^@^@^B^@^@^@^C^@^@^@��������^S^@^@^@^@^@^@^@^D^@^@^@^E^@^@^@�������� ^@^@^@^@^@^@^@^B^@^@^@^B^@^@^@^@^@^@^@^@^@^@^@^@.symtab^@.strtab^@.shstrtab^@.rela.text^@.data^@.bss^@.rodata^@.comment^@.note.GNU-stack^@.note.gnu.property^@.rela.eh_frame^@^@^@^@^@^@^@^@^@^@^@^@^@^@^@^@^@^@^@^@^@^@^@^@^@^@^@^@^@^@^@^@^@^@^@^@^@^@^@^@^@^@^@^@^@^@^@^@^@^@^@^@^@^@^@^@^@^@^@^@^@^@^@^@^@^@^@^@^@ ^@^@^@^A^@^@^@^F^@^@^@^@^@^@^@^@^@^@^@^@^@^@^@@^@^@^@^@^@^@^@^^^@^@^@^@^@^@^@^@^@^@^@^@^@^@^@^A^@^@^@^@^@^@^@^@^@^@^@^@^@^@^@^[^@^@^@^D^@^@^@@^@^@^@^@^@^@^@^@^@^@^@^@^@^@^@�^A^@^@^@^@^@^@0^@^@^@^@^@^@^@^K^@^@^@^A^@^@^@^H^@^@^@^@^@^@^@^X^@^@^@^@^@^@^@&^@^@^@^A^@^@^@^C^@^@^@^@^@^@^@^@^@^@^@^@^@^@^@^^@^@^@^@^@^@^@^@^@^@^@^@^@^@^@^@^@^@^@^@^@^@^@^A^@^@^@^@^@^@^@^@^@^@^@^@^@^@^@,^@^@^@^H^@^@^@^C^@^@^@^@^@^@^@^@^@^@^@^@^@^@^@^^@^@^@^@^@^@^@^@^@^@^@^@^@^@^@^@^@^@^@^@^@^@^@^A^@^@^@^@^@^@^@^@^@^@^@^@^@^@^@1^@^@^@^A^@^@^@^B^@^@^@^@^@^@^@^@^@^@^@^@^@^@^@^^@^@^@^@^@^@^@
^@^@^@^@^@^@^@^@^@^@^@^@^@^@^@^A^@^@^@^@^@^@^@^@^@^@^@^@^@^@^@9^@^@^@^A^@^@^@0^@^@^@^@^@^@^@^@^@^@^@^@^@^@^@k^@^@^@^@^@^@^@'^@^@^@^@^@^@^@^@^@^@^@^@^@^@^@^A^@^@^@^@^@^@^@^A^@^@^@^@^@^@^@B^@^@^@^A^@^@^@^@^@^@^@^@^@^@^@^@^@^@^@^@^@^@^@�^@^@^@^@^@^@^@^@^@^@^@^@^@^@^@^@^@^@^@^@^@^@^@^A^@^@^@^@^@^@^@^@^@^@^@^@^@^@^@R^@^@^@^G^@^@^@^B^@^@^@^@^@^@^@^@^@^@^@^@^@^@^@�^@^@^@^@^@^@^@ ^@^@^@^@^@^@^@^@^@^@^@^@^@^@^@^H^@^@^@^@^@^@^@^@^@^@^@^@^@^@^@j^@^@^@^A^@^@^@^B^@^@^@^@^@^@^@^@^@^@^@^@^@^@^@�^@^@^@^@^@^@^@8^@^@^@^@^@^@^@^@^@^@^@^@^@^@^@^H^@^@^@^@^@^@^@^@^@^@^@^@^@^@^@e^@^@^@^D^@^@^@@^@^@^@^@^@^@^@^@^@^@^@^@^@^@^@�^A^@^@^@^@^@^@^X^@^@^@^@^@^@^@^K^@^@^@ ^@^@^@^H^@^@^@^@^@^@^@^X^@^@^@^@^@^@^@^A^@^@^@^B^@^@^@^@^@^@^@^@^@^@^@^@^@^@^@^@^@^@^@�^@^@^@^@^@^@^@�^@^@^@^@^@^@^@^L^@^@^@^D^@^@^@^H^@^@^@^@^@^@^@^X^@^@^@^@^@^@^@    ^@^@^@^C^@^@^@^@^@^@^@^@^@^@^@^@^@^@^@^@^@^@^@�^A^@^@^@^@^@^@^S^@^@^@^@^@^@^@^@^@^@^@^@^@^@^@^A^@^@^@^@^@^@^@^@^@^@^@^@^@^@^@^Q^@^@^@^C^@^@^@^@^@^@^@^@^@^@^@^@^@^@^@^@^@^@^@�^A^@^@^@^@^@^@t^@^@^@^@^@^@^@^@^@^@^@^@^@^@^@^A^@^@^@^@^@^@^@^@^@^@^@^@^@^@^@
Object files are in fact ELF files (the same format as Linux executables and shared libraries). To view the different sections of this ELF file in a way that is understandable by humans use the following command:
objdump -s hello.oThis would result in output similar to the following:
hello.o:     file format elf64-x86-64

Contents of section .text:
 0000 f30f1efa 554889e5 488d0500 00000048  ....UH..H......H
 0010 89c7e800 000000b8 00000000 5dc3      ............].
Contents of section .rodata:
 0000 48656c6c 6f2c2057 6f726c64 00        Hello, World.
Contents of section .comment:
 0000 00474343 3a202855 62756e74 75203131  .GCC: (Ubuntu 11
 0010 2e322e30 2d313975 62756e74 75312920  .2.0-19ubuntu1)
 0020 31312e32 2e3000                      11.2.0.
Contents of section .note.gnu.property:
 0000 04000000 10000000 05000000 474e5500  ............GNU.
 0010 020000c0 04000000 03000000 00000000  ................
Contents of section .eh_frame:
 0000 14000000 00000000 017a5200 01781001  .........zR..x..
 0010 1b0c0708 90010000 1c000000 1c000000  ................
 0020 00000000 1e000000 00450e10 8602430d  .........E....C.
 0030 06550c07 08000000                    .U......
Do note that object files are not meant to be loaded into memory or executed by the OS. This is because object files do not contain segments in the program header and it is assumed that the file will be linked with some other code. To validate that this in fact the case, use the readelf program to check if an object file has the necessary segments in the program header to be executed by the OS:
readelf --segments hello.oThe above command should return the following output:
There are no program headers in this file.To learn more about ELF files, have a look at the ELF Linux Man pages. Now that we have a better understanding of the assembly process, let’s dig deeper into the final phase that our hello.c application goes through during its life, the linking phase.
Linking Phase
In this phase, the (ld) program finds all external functions and shared libraries that need to be merged or linked with our hello.o program. An example of this is the printf function which is part of the standard C library provided by every C compiler. This file resides in a separate precompiled object file that the linker has to search for. The result is a hello file, that can be loaded into memory and executed by the system. Fig 7, shows an example of this process in action.
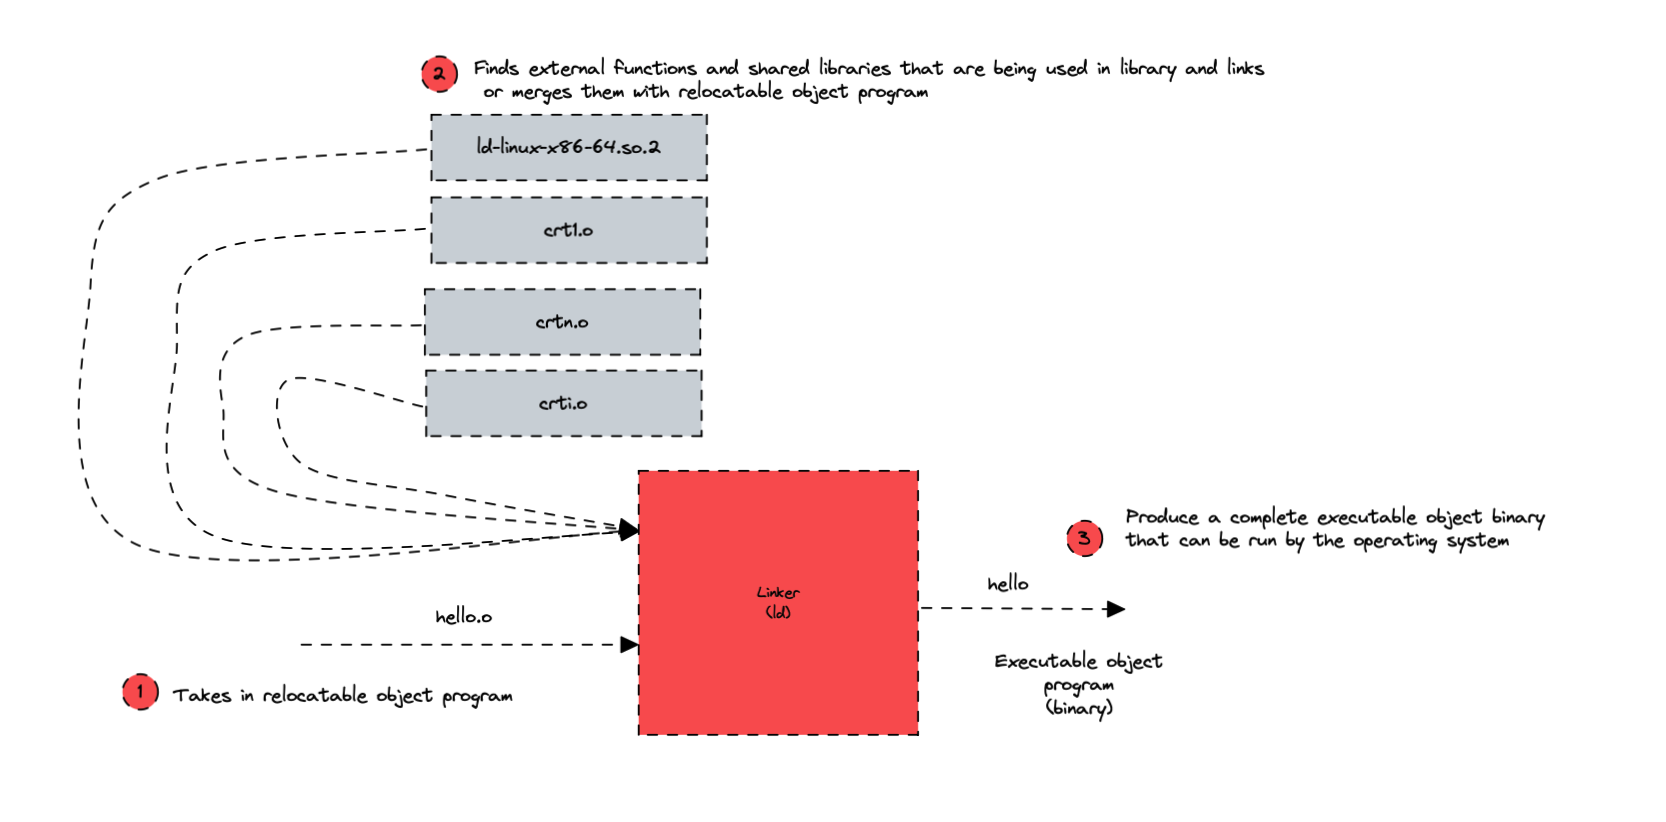
Fig 7: Linking phase in action
Below is the command that I used to generate the final executable object program using the ld program:
ld -o hello -dynamic-linker /lib64/ld-linux-x86-64.so.2 /usr/lib/gcc/x86_64-linux-gnu/11/../../../x86_64-linux-gnu/crt1.o /usr/lib/gcc/x86_64-linux-gnu/11/../../../x86_64-linux-gnu/crti.o hello.o -lc /usr/lib/gcc/x86_64-linux-gnu/11/../../../x86_64-linux-gnu/crtn.oGenerally, we would not go through these steps ourselves, rather the gcc program would take care of all the steps to generate a final executable object program ready to be executed by the OS as we saw earlier in this article.
We have finally seen first-hand what happens in each phase of the compilation pipeline. We were also introduced to the various programs that collectively make up the compilation system (cpp, cc, as, ld) and what happens during each phase.
In the next article, we will continue to explore the enduring concepts behind computing systems by looking at why understanding the compilation system can help us:
- Optimize program performance
- Understand link-time errors
- Avoid buffer overflow vulnerabilities and much more
If you believe that understanding these fundamental concepts is essential, feel free to share with your network of friends and acquintances. I would highly appreciate it.